

How to Build Deck Stairs | DIY Deck Framing Guide
- Scott Klemetson

- Apr 10
- 4 min read
Building deck stairs is where a lot of DIY projects slow down.
It’s not that it’s complicated. It’s just a step where small mistakes stack up quickly if you don’t plan it out first.
We’ve helped a lot of homeowners through this part of their build, and most issues come down to layout, not the actual cutting or assembly.
So before you grab a saw, here’s how to think through your stair build the right way.

Start With Your Total Height (Not Your First Cut)
Before anything gets cut, you need to know your total rise.
That’s the distance from the top of your deck down to where your stairs will land.
In the Trex training video, they measure from the finished deck height down to the top of a solid landing surface like a concrete pad.
That part matters more than most people realize.
If your ground slopes away from the house, your stair height can change depending on where the stairs land.
Quick check:
Are you measuring from where the stairs actually end, or just straight down from your deck?

Understand Rise and Run Before You Cut Stringers
Every stair is built from two numbers:
Rise (height of each step)Run (depth of each step)
In this example, the total height was 30 inches, split into 4 steps, giving a 7-1/2 inch rise.
That stays under the typical max of 7-3/4 inches required by code.
For the run, they worked off the decking layout and landed at about 10 inches per step.
Here’s what matters:
These numbers need to stay consistent across every step.
If one step is off, you’ll feel it immediately when walking the stairs.

Always Build Stairs to a Solid Landing
Your stairs can’t just sit on dirt.
Code requires a solid surface at the bottom, usually concrete, pavers, or another hard material.
We see this missed all the time.
Over time, soil shifts. That movement transfers right into your stairs.
That’s when you start to see movement, gaps, or uneven steps.
Simple rule:
Your stairs are only as solid as what they sit on.
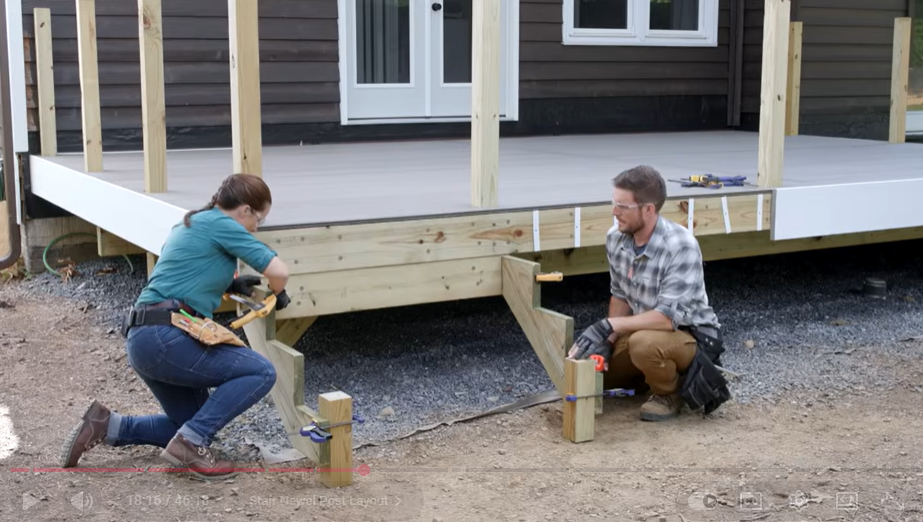
Cut Stringers Carefully (And Use a Template if Needed)
Stringers are the backbone of your stairs.
They’re cut from 2x12 lumber and notched to match your rise and run.
One thing we liked from this process is using a simple template made from scrap wood instead of buying extra tools.
That’s a practical move for most DIY builds.
Important detail:
After cutting, you need to adjust the bottom of the stringer slightly so all steps end up equal once decking is installed.
Quick check:
Are all your step heights equal from bottom to top?
Spacing Your Stringers Matters More Than You Think
This is where your deck boards come into play.
In this build, stringers were spaced 9 inches on center to support composite decking properly.
That spacing can change depending on the material you’re using.
Too wide, and your boards can flex.
Too tight, and you’re adding unnecessary work.
If you’re using Trex, this is something worth double-checking before you install anything.

Use Temporary Supports to Make Installation Easier
One of the best takeaways here is using a simple support block during installation.
It acts like an extra set of hands and keeps everything lined up while you fasten your stringers.
We see a lot of DIY builds where people try to hold everything in place while fastening.
That’s where things start to shift.
A small step like this makes the whole process easier and more accurate.
Lock Everything Together for Strength
Once your stringers are in place, everything needs to be tied together.
That includes:
Top connections to the deck
Bottom support on the landing
Front rim board tying all stringers together
They also use hardware like straps or brackets to handle both vertical and side-to-side forces.
This is what keeps your stairs from shifting over time.

Protect the Framing Before You Finish
Before installing treads, take a minute to protect your framing.
In the video, they use protective tape over the top of the stringers to help prevent water damage.
It’s a small step, but it extends the life of the build.
We always recommend thinking long-term here, especially with how much traffic stairs get.

Installing Treads and Risers
At this stage, it starts to come together.
You can install treads first or risers first. Both methods work.
In this build, they installed treads first to create a clean overhang and consistent look.
Since they used square edge boards, they fastened from the top with color-matched screws instead of hidden fasteners.
Key detail:
Stay consistent with spacing and fastener placement so everything lines up clean.
Finishing With Fascia
The final step is adding fascia to clean up the sides of the stairs.
You can either plan this ahead of time or trace it after everything is installed.
Both approaches work, but planning ahead usually saves time.
This is what gives the stairs a finished, professional look.

Summary
Stairs come down to planning more than anything else.
Get your total height right first
Keep your rise and run consistent
Build on a solid landing
Space your stringers correctly for your decking
Take your time on layout before fastening anything
If you slow down at the beginning, the rest of the build goes a lot smoother.
If you’re planning a deck and thinking about building your own stairs, we can help you get everything lined up before you start.
Stop into our showroom or bring in your measurements.
We’ll walk through your layout, materials, and spacing so you can build it with confidence.


Comments